My environment is Ubuntu jaunty (9.04).
sudo aptitude install nis dhcp3-server tftpd
sudo ifconfig eth0:1 192.168.0.1 (when system only has 1 nic port)
# import gpg key
wget -q http://drbl.sourceforge.net/GPG-KEY-DRBL -O- | sudo apt-key add -
# add following line into source list
# then aptitude update and install drbl
deb http://drbl.sourceforge.net/drbl-core drbl stable testing unstable
# For setting up system environment, here has lots of setting, and choose which IP to be the PXE interface should be the most important portion.
sudo /opt/drbl/sbin/drblsrv -i
sudo /opt/drbl/sbin/drblpush -i
-----------------------------------
# start to use clonezilla
sudo /opt/drbl/sbin/dcs
# clone the client image
All --> clonezilla-start --> Beginner --> save-disk
# restore the local image to the client
All --> clonezilla-start --> Beginner --> restore-disk
Now you can boot up your client, then it will show you the GRUB menu with deploy option.
星期五, 7月 03, 2009

星期六, 10月 04, 2008
一篇對RHEL Performance不錯的文章
According to below link.
http://searchenterpriselinux.techtarget.com/tip/0,289483,sid39_gci1332851,00.html
http://searchenterpriselinux.techtarget.com/tip/0,289483,sid39_gci1332851,00.html
星期三, 9月 10, 2008
Linux下的Hibernate(Suspend to Disk) – ACPI定義的睡眠模式之一
延續上一篇“電源管理—Linux下的ACPI”,這次談談更深入的Linux Hibernate的作法。Linux在許多使用上,其實都已經做到Desktop所需要的功能,像我所要介紹的Hibernate功能就是其中之一。
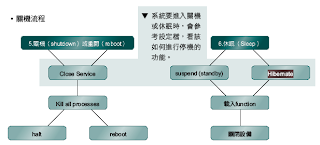
從上圖中可以發現,Hibernate和關機的差異是非常大的,可以說是完全不一樣的事情,在一般看得到的書中,Hibernate就是一般我們在ACPI中所謂的G1S4。
G1指得是“Sleeping”,也就是睡眠狀態,一般會用到G1的情況有兩種,Standby或Hibernate,分別為G1S3與G1S4,這兩種的差異主要在於Suspend to RAM(STR)及Suspend to Disk(STD)。
因此S4指得則是第四個階段,也就是Suspend to Disk(STD),所以G1S4整體的意思就是讓系統睡得程度到“Hibernate”階段。之前使用者較常會用到的應該是S3,因此電源都無法完全關掉,會有些許的電源用來供應記憶體,但S4則可以做到將電源完全關掉,而保留住系統目前的狀態。
但Hibernate的動作在Linux中是如何達到,以及到底做了哪些事情,當Hibernate進行時又是參考哪些檔案,是這篇文章中要介紹給各位的。
1. Hibernate所參考的檔案
Hibernate所參考檔案都是由pm-utils套件所提供的,pm-utils是一套電源管理的工具軟體,在2.6的kernel之後,都已經支援ACPI的功能,所以可以做到像Hibernate的省電模式,但這些動作在啟動時,若還有硬體(像USB設備)在系統上該如何處理,就可以透過pm-utils來做一些關閉硬體的動作,但其實pm-utils是透過一個『HAL』的服務程式(在Redhat中此服務的檔案名稱為haldaemon)在控制,所以一般看不到pm的字眼。不過雖然是透過HAL在操作,但使用者一樣可以加一些自己的動作在其中,做細部的調整。
基本上pm-utils除了【/etc/pm】這一個目錄外,【/usr/lib/pm-utils】也是主要的目錄之一,其實如果細看【/etc/pm】,裡面是空無一物,因為這是預留給使用者自行使用的地方,系統真正在執行的,是在【/usr/lib/pm-utils】底下的檔案,不過【/etc/pm】是可以使用的,只是檔案要自行產生。
在【/usr/lib/pm-utils】下,最好用的目錄就要屬sleep.d這一個(如下圖所示),因為當使用者在進行Hibernate(休眠模式)時,就會依據這目錄中的檔名前兩碼數字的大小(由小到大),依序進行執行的動作(正常應該說是關閉的動作,但因為可以自行設定,不在這邊定義為關閉);相同的,在【/etc/pm】的目錄下,也有和這邊類似的目錄,只是都是空的,這在上面有提過。不過這邊有幾點是要特別注意的:
a. 系統在進行Hibernate時,是先執行【/etc/pm】的目錄,再執行【/usr/lib/pm-utils】目錄中的檔案;但啟動是相反的,會先執行【/usr/lib/pm-utils】後,再執行【/etc/pm】目錄下的檔案。
b. 系統在進行Hibernate時,會從目錄中檔名的前兩碼數字由小到大進行執行動作;但再開機時,是相反的,也就是會由數字大到小執行。
這兩點要注意的原因,主要是一般預設立場是要進行關閉的動作,所以往往會忽略開機時是要進行啟動,剛好目的是相反的,自然順序也就跟著變動,在細節的設計上要特別注意。

2. Hibernate所進行的方式
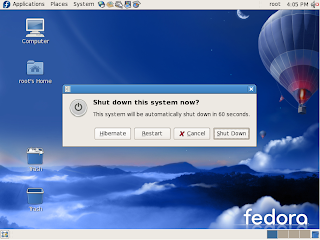
最簡單要進行Hibernate的方式,就是在X Window關機時,不要用原本關機的選項,而改用『Hibernate』的方式(如下圖所示),只要點選下去,系統就會自動進行Hibernate,但要注意,若系統中的“haldaemon”沒有啟動,是不會有這選項的。
如果需要比較進階的使用,就必需要參考到/sys/power目錄,該目錄是主要Hibernate在進行時的“開關”,這一個目錄只存放和電源模式有關的檔案,更正確的說法,是只有電源管理機制的檔案。裡面只有幾個屬性檔案在其中,屬性名稱(也就是檔案名稱)及其值都請參考下圖

每個屬性的意義介紹如下:
1. disk:當使用者在做休眠模式中S4的STD(suspend to disk,或稱為Hibernate)時,要將系統的狀況寫入到硬碟中,因此這邊是在定義當狀態寫入到硬碟後,“系統”該如何運作。基本上目前2.6的kernel支援以下五種模式:
a. platform:不知其運作方式,但只有在該平台有支援時才可使用。
b. shutdown:當進入休眠時進入關機狀態。
c. reboot:當進入休眠時進入重新開機狀態。
d. testproc:testproc與下一個test,這兩者的模式比較特別,都是屬於即時測試休眠功能所可可以使用的狀態,也就是可以讓使用者進入模擬的休眠模式,再自動回複到原本的系統狀態,所以一直都在原本的使用狀態下。
testproc主要有以下幾個步驟(系統訊息如下圖所示):
關閉未使用的CPU 凍結所有的工作 等五秒鐘 將原本的工作還原 打開原本未啟動的CPU
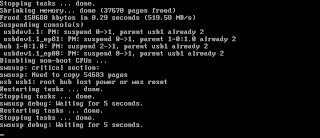
e. test:和前一個testproc的不同,是在測試時更完整,連記憶體和硬體設備的部份也加入模擬的階段。
test主要有以下幾個步驟(系統訊息如下圖所示):
關閉未使用的CPU 凍結所有的工作 壓縮記憶體 關閉設備 等五秒鐘 恢復設備的狀態 將原本的工作還原 打開原本未啟動的CPU

這五種中最常被使用的就是“shutdown”(a不知其作用為何,但一定要系統有支援才可使用),後三者(“reboot”、“testproc”、“test”)則較少為人知,因為這三種大部份是在測試單位(可能也只在專門測試休眠功能的單位)才有機會被使用到,不然使用的機會少之又少,但實在是一個造福測試者的功能。不過使用上真的很簡單,如筆者電腦的“disk”檔案預設設定為“shutdown”,如果更改為“reboot”,當休眠完成後,將不會關機,而是“重開”。
所以想當然,誰會在做休眠時的下一步要“重新開機”,這樣完全無法省電,所比這一個機制其實是還是為了測試休眠模式所定義的,只是可能會將測試的範圍擴大到整個系統的流程,而不是像“testproc”和“test”僅限於測試休眠的部份功能,畢竟完整的動作是包含關機與開機。
2. image_size:目前系統可接受的最大image大小,預設為512MB。
3. pm_trace:這是一個控制開關,可比決定是否要記錄在多次的重新開機後,最後一次存在RTC中的事件點,預設值為“0”,代表不記錄,若改為“1”,則可進行記錄的動作。
4. resume:當系統進行S4(suspend to disk)時,系統要將系統狀態寫入的位置。所以這屬性其實是代表某一個分割區的major及minor ID(一般都是SWAP分割區),若需要使用resume分割區,就必須在開機時先在GRUB的開機參數中,加入resume=/dev/xxxx的參數,才可以讓系統知道要使用該分割區當寫入的分割區。在下圖中的resume值之所以為“0:0”,是因為主機中沒有設定該參數(SuSE在預設就會加入該參數)。
5. state:目前系統可支援的休眠模式,一般只會有以下三種(或只有其中一兩種)狀態(S2一般電腦都不會支援):
a. standby:就是一般所謂的S1,S1是在睡眠狀態中最吃電的一種狀態,CPU中的cache都持續供電,但停止執行指令。在CPU及記憶體的部份都有電力在供應,但其他的裝置就沒有硬性規定,可斷電也可供電。
b. mem:就是S3(suspend to ram),在此狀態下,只有主記憶體有接受供電的權利。但值得注意的是,雖然大部份的資料都會回寫到記憶體,但硬碟本身的Buffer有可能來不及回寫到硬碟,這樣就會造成資料流失。
c. disk:就是S4(suspend to disk),俗稱休眠狀態(Hibernet,或稱冬眠狀態),其技術上的名稱則為Suspend to Disk (STD),這一階段會將所有執行中的資料全部寫入到硬碟中,而之所以要寫入硬碟,就是因為要完全的斷電,但也因為如此,在回覆到原本工作狀態所使用的時間會比S3來得久。
更簡單的說,其實如果將“state”檔案以“disk”值寫入(如:【echo “disk” > /sys/power/state】),這動作等於切換“state”開關至“disk”選項,因此系統就會直接進入休眠,並且將休眠模式認定為前面我們提過的“disk”檔案中所記載的方式,像“shutdown”。

從上圖中可以發現,Hibernate和關機的差異是非常大的,可以說是完全不一樣的事情,在一般看得到的書中,Hibernate就是一般我們在ACPI中所謂的G1S4。
G1指得是“Sleeping”,也就是睡眠狀態,一般會用到G1的情況有兩種,Standby或Hibernate,分別為G1S3與G1S4,這兩種的差異主要在於Suspend to RAM(STR)及Suspend to Disk(STD)。
因此S4指得則是第四個階段,也就是Suspend to Disk(STD),所以G1S4整體的意思就是讓系統睡得程度到“Hibernate”階段。之前使用者較常會用到的應該是S3,因此電源都無法完全關掉,會有些許的電源用來供應記憶體,但S4則可以做到將電源完全關掉,而保留住系統目前的狀態。
但Hibernate的動作在Linux中是如何達到,以及到底做了哪些事情,當Hibernate進行時又是參考哪些檔案,是這篇文章中要介紹給各位的。
1. Hibernate所參考的檔案
Hibernate所參考檔案都是由pm-utils套件所提供的,pm-utils是一套電源管理的工具軟體,在2.6的kernel之後,都已經支援ACPI的功能,所以可以做到像Hibernate的省電模式,但這些動作在啟動時,若還有硬體(像USB設備)在系統上該如何處理,就可以透過pm-utils來做一些關閉硬體的動作,但其實pm-utils是透過一個『HAL』的服務程式(在Redhat中此服務的檔案名稱為haldaemon)在控制,所以一般看不到pm的字眼。不過雖然是透過HAL在操作,但使用者一樣可以加一些自己的動作在其中,做細部的調整。
基本上pm-utils除了【/etc/pm】這一個目錄外,【/usr/lib/pm-utils】也是主要的目錄之一,其實如果細看【/etc/pm】,裡面是空無一物,因為這是預留給使用者自行使用的地方,系統真正在執行的,是在【/usr/lib/pm-utils】底下的檔案,不過【/etc/pm】是可以使用的,只是檔案要自行產生。
在【/usr/lib/pm-utils】下,最好用的目錄就要屬sleep.d這一個(如下圖所示),因為當使用者在進行Hibernate(休眠模式)時,就會依據這目錄中的檔名前兩碼數字的大小(由小到大),依序進行執行的動作(正常應該說是關閉的動作,但因為可以自行設定,不在這邊定義為關閉);相同的,在【/etc/pm】的目錄下,也有和這邊類似的目錄,只是都是空的,這在上面有提過。不過這邊有幾點是要特別注意的:
a. 系統在進行Hibernate時,是先執行【/etc/pm】的目錄,再執行【/usr/lib/pm-utils】目錄中的檔案;但啟動是相反的,會先執行【/usr/lib/pm-utils】後,再執行【/etc/pm】目錄下的檔案。
b. 系統在進行Hibernate時,會從目錄中檔名的前兩碼數字由小到大進行執行動作;但再開機時,是相反的,也就是會由數字大到小執行。
這兩點要注意的原因,主要是一般預設立場是要進行關閉的動作,所以往往會忽略開機時是要進行啟動,剛好目的是相反的,自然順序也就跟著變動,在細節的設計上要特別注意。

2. Hibernate所進行的方式
最簡單要進行Hibernate的方式,就是在X Window關機時,不要用原本關機的選項,而改用『Hibernate』的方式(如下圖所示),只要點選下去,系統就會自動進行Hibernate,但要注意,若系統中的“haldaemon”沒有啟動,是不會有這選項的。

如果需要比較進階的使用,就必需要參考到/sys/power目錄,該目錄是主要Hibernate在進行時的“開關”,這一個目錄只存放和電源模式有關的檔案,更正確的說法,是只有電源管理機制的檔案。裡面只有幾個屬性檔案在其中,屬性名稱(也就是檔案名稱)及其值都請參考下圖

每個屬性的意義介紹如下:
1. disk:當使用者在做休眠模式中S4的STD(suspend to disk,或稱為Hibernate)時,要將系統的狀況寫入到硬碟中,因此這邊是在定義當狀態寫入到硬碟後,“系統”該如何運作。基本上目前2.6的kernel支援以下五種模式:
a. platform:不知其運作方式,但只有在該平台有支援時才可使用。
b. shutdown:當進入休眠時進入關機狀態。
c. reboot:當進入休眠時進入重新開機狀態。
d. testproc:testproc與下一個test,這兩者的模式比較特別,都是屬於即時測試休眠功能所可可以使用的狀態,也就是可以讓使用者進入模擬的休眠模式,再自動回複到原本的系統狀態,所以一直都在原本的使用狀態下。
testproc主要有以下幾個步驟(系統訊息如下圖所示):
關閉未使用的CPU 凍結所有的工作 等五秒鐘 將原本的工作還原 打開原本未啟動的CPU

e. test:和前一個testproc的不同,是在測試時更完整,連記憶體和硬體設備的部份也加入模擬的階段。
test主要有以下幾個步驟(系統訊息如下圖所示):
關閉未使用的CPU 凍結所有的工作 壓縮記憶體 關閉設備 等五秒鐘 恢復設備的狀態 將原本的工作還原 打開原本未啟動的CPU

這五種中最常被使用的就是“shutdown”(a不知其作用為何,但一定要系統有支援才可使用),後三者(“reboot”、“testproc”、“test”)則較少為人知,因為這三種大部份是在測試單位(可能也只在專門測試休眠功能的單位)才有機會被使用到,不然使用的機會少之又少,但實在是一個造福測試者的功能。不過使用上真的很簡單,如筆者電腦的“disk”檔案預設設定為“shutdown”,如果更改為“reboot”,當休眠完成後,將不會關機,而是“重開”。
所以想當然,誰會在做休眠時的下一步要“重新開機”,這樣完全無法省電,所比這一個機制其實是還是為了測試休眠模式所定義的,只是可能會將測試的範圍擴大到整個系統的流程,而不是像“testproc”和“test”僅限於測試休眠的部份功能,畢竟完整的動作是包含關機與開機。
2. image_size:目前系統可接受的最大image大小,預設為512MB。
3. pm_trace:這是一個控制開關,可比決定是否要記錄在多次的重新開機後,最後一次存在RTC中的事件點,預設值為“0”,代表不記錄,若改為“1”,則可進行記錄的動作。
4. resume:當系統進行S4(suspend to disk)時,系統要將系統狀態寫入的位置。所以這屬性其實是代表某一個分割區的major及minor ID(一般都是SWAP分割區),若需要使用resume分割區,就必須在開機時先在GRUB的開機參數中,加入resume=/dev/xxxx的參數,才可以讓系統知道要使用該分割區當寫入的分割區。在下圖中的resume值之所以為“0:0”,是因為主機中沒有設定該參數(SuSE在預設就會加入該參數)。
5. state:目前系統可支援的休眠模式,一般只會有以下三種(或只有其中一兩種)狀態(S2一般電腦都不會支援):
a. standby:就是一般所謂的S1,S1是在睡眠狀態中最吃電的一種狀態,CPU中的cache都持續供電,但停止執行指令。在CPU及記憶體的部份都有電力在供應,但其他的裝置就沒有硬性規定,可斷電也可供電。
b. mem:就是S3(suspend to ram),在此狀態下,只有主記憶體有接受供電的權利。但值得注意的是,雖然大部份的資料都會回寫到記憶體,但硬碟本身的Buffer有可能來不及回寫到硬碟,這樣就會造成資料流失。
c. disk:就是S4(suspend to disk),俗稱休眠狀態(Hibernet,或稱冬眠狀態),其技術上的名稱則為Suspend to Disk (STD),這一階段會將所有執行中的資料全部寫入到硬碟中,而之所以要寫入硬碟,就是因為要完全的斷電,但也因為如此,在回覆到原本工作狀態所使用的時間會比S3來得久。
更簡單的說,其實如果將“state”檔案以“disk”值寫入(如:【echo “disk” > /sys/power/state】),這動作等於切換“state”開關至“disk”選項,因此系統就會直接進入休眠,並且將休眠模式認定為前面我們提過的“disk”檔案中所記載的方式,像“shutdown”。
星期四, 5月 08, 2008
socket與協定的觀念 - 以nc與http為例
port這東西有時候好像很難解釋, 但如果透過實際的操作就很好理解
先在該台主機上要產生一個192.1.1.1:1111的門,也就是socket, 讓大家可以連線
nc -l 192.1.1.1 1111
可以在另一台主機上使用
telnet 192.1.1.1 1111
這樣就可以雙方進行對話
因此協定的目的, 就在讓雙方可以透過socket進行"對話", 對話的規範就叫協定
像Web Server, 其實是可以透過telnet的方式將網頁抓回來
只是要知道HTTP協定的對話模式, 以及對方應有的網頁檔名
簡單的可以用下面的範例
telnet 192.1.1.1 80
進入後再輸入
GET /index.html
就可以看到index.html的內容
先在該台主機上要產生一個192.1.1.1:1111的門,也就是socket, 讓大家可以連線
nc -l 192.1.1.1 1111
可以在另一台主機上使用
telnet 192.1.1.1 1111
這樣就可以雙方進行對話
因此協定的目的, 就在讓雙方可以透過socket進行"對話", 對話的規範就叫協定
像Web Server, 其實是可以透過telnet的方式將網頁抓回來
只是要知道HTTP協定的對話模式, 以及對方應有的網頁檔名
簡單的可以用下面的範例
telnet 192.1.1.1 80
進入後再輸入
GET /index.html
就可以看到index.html的內容
星期二, 1月 08, 2008
Solaris DHCP server configuration tips
#hostname pxeserver
Create DHCP tables in /var/dhcp
#dhcpconfig -D -r SUNWfiles -p /var/dhcp
Start and Stop DHCP service
dhcpconfig -S -d <-- stop dhcpconfig -S -e <-- start PXE default settings # dhtadm -A -m PXEClient:Arch:00000:UNDI:002001 -d ':BootSrvA=192.1.1.254:' Create options # dhtadm -A -s SrootIP4 -d ’Vendor=SUNW.i86pc,2,IP,1,1’ # dhtadm -A -s SrootNM -d ’Vendor=SUNW.i86pc,3,ASCII,1,0’ # dhtadm -A -s SrootPTH -d ’Vendor=SUNW.i86pc,4,ASCII,1,0’ # dhtadm -A -s SinstIP4 -d ’Vendor=SUNW.i86pc,10,IP,1,1’ # dhtadm -A -s SinstNM -d ’Vendor=SUNW.i86pc,11,ASCII,1,0’ # dhtadm -A -s SinstPTH -d ’Vendor=SUNW.i86pc,12,ASCII,1,0’ # dhtadm -A -s SsysidCF -d ’Vendor=SUNW.i86pc,13,ASCII,1,0’ # dhtadm -A -s SjumpsCF -d ’Vendor=SUNW.i86pc,14,ASCII,1,0’ # dhtadm -A -s SbootURI -d ’Vendor=SUNW.i86pc,16,ASCII,1,0’ Add a PXE client # ./add_install_client -d -e "00:a0:d1:e1:a5:3d" \ <-- Client's MAC address # > -s 192.1.1.1:/export/home/sol10 \
# > i86pc
Create private macro for MAC
# dhtadm -A -m 0100A0D1E1173C -d ':SinstNM=192.1.1.254:SinstIP4=192.1.1.254:SinstPTH=/export/home/sol10_ga:SrootNM=client:SrootIP4=192.1.1.254:SrootP
TH=/export/home/sol10_ga/Solaris_10/Tools/Boot:BootFile=nbp.0100A0D1E1173C:SbootURI=tftp\://192.1.1.254/0100A0D1E1173C:'
# dhtadm -A -m 192.1.1.0 -d ':Subnet=255.255.255.0:RDiscvyF=1:Broadcst=192.1.1.255:'
Create IP to suit the macro
# pntadm -C 192.1.1.0
# pntadm -A 192.1.1.100 192.1.1.0
# pntadm -M 192.1.1.100 -m 0100A0D1E1173C 192.1.1.0
Solaris PXE server installation and configuration
DHCP
1. /usr/sadm/admin/bin/dhcpmgr command under GUI
2. Now finish configuring DHCP service
3. You can start and stop service by this tool
NFS Image files
1. create /export/home/sol10 directory
2. insert the first CD in the CDROM. Go to /cdrom/cdrom0/s2/Solaris_10/Tools
3. Execute the following command:
# ./setup_install_server /export/home/sol10
4. After finishing the CD1, change to another disk step by step(CD2,3,4) and into the same directory
5. Execute the following command:
# ./add_to_install_server /export/home/sol10
NFS
1. Edit /etc/dfs/dfstab file and add a following line.
share –F nfs –o ro,anon=0 –d "install server directory” /export/home/sol10
2. Do "shareall" command
3. Type "share" command to see if it works.
4. Do command "svcadm enable network/nfs/server"
5. "showmount -e" to see if it works or check "ps -efgrep nfs".
6. If not, do it by yourself like below.
/usr/lib/nfs/nfsd -a
/usr/lib/nfs/statd
/usr/lib/nfs/nfsmapid
/usr/lib/nfs/lockd
/usr/lib/nfs/mountd
7. It should be work now. If not, call the police.....:)
PXE and DHCP
1. Get into /export/home/sol10/Solaris_10/Tools
2.
# ./add_install_client -d -e "00:a0:d1:e1:a5:3d" \ <-- Client's MAC address # > -s 192.1.1.1:/export/home/sol10 \
# > i86pc
$$$$ It shows some messages and VERY IMPORTANT about the PXE function.
3.
Do following command to make the same option for dhcp.
# dhtadm -A -s SrootIP4 -d ’Vendor=SUNW.i86pc,2,IP,1,1’
# dhtadm -A -s SrootNM -d ’Vendor=SUNW.i86pc,3,ASCII,1,0’
# dhtadm -A -s SrootPTH -d ’Vendor=SUNW.i86pc,4,ASCII,1,0’
# dhtadm -A -s SinstIP4 -d ’Vendor=SUNW.i86pc,10,IP,1,1’
# dhtadm -A -s SinstNM -d ’Vendor=SUNW.i86pc,11,ASCII,1,0’
# dhtadm -A -s SinstPTH -d ’Vendor=SUNW.i86pc,12,ASCII,1,0’
# dhtadm -A -s SsysidCF -d ’Vendor=SUNW.i86pc,13,ASCII,1,0’
# dhtadm -A -s SjumpsCF -d ’Vendor=SUNW.i86pc,14,ASCII,1,0’
# dhtadm -A -s SbootURI -d ’Vendor=SUNW.i86pc,16,ASCII,1,0’
4. And then use “/usr/sadm/adm/bin/dhcpmgr&” to call the GUI programe to configure following items.
5. Create 2 macros as it said. (0100xxxxxx and the PXEClientxxxxx)
6. Create the Address FOR the macro.
7. Now finish configuring DHCP with PXE service
8. You can start and stop service by this tool
Trouble Shooting
1. If cannot boot from the client and cause by the driver.
a. Modify path
/export/home/sol10/Solaris_10/Tools/Boot/boot/solaris/devicedb/master
Change driver name from none to “bge.bef” or something like that.
b. Modify path
/export/home/sol10/Solaris_10/Tools/Boot/etc/driver_aliases
Add a line bge “pci14e4,16a8” <-- It shows on your client’s error message. 2. If cannot put into the CDs, please do following command in CLI mode. # svcadm enable smserver 3. The command “lspci” usage in Solaris # prtconf –pv
PXE Server configuration tips
chkconfig tftp on
chkconfig xinetd on
chkconfig nfs on
chkconfig dhcpd on
##Copy all DVD source into NFS folder
cp -a /mnt/* /var/ftp/fedora7
##Copy needed files into tftp folder
mkdir /tftpboot/linux-install/fedora7
cp /var/ftp/fedora7/image/pxeboot/vmlinuz /tftpboot/linux-install/fedora7
cp /var/ftp/fedora7/image/pxeboot/initrd /tftpboot/linux-install/fedora7
##Edit PXE config file
vi /tftpboot/linux-install/pxelinux.cfg/default
--------------------------------------------------------
default 0
timeout 2000
prompt 1
display msgs/boot.msg
label 1
kernel fedora7/vmlinuz
append initrd=fedora7/initrd.img ramdisk_size=65536
## Edit message config file
vi /tftpboot/linux-install/msgs/boot.msg
--------------------------------------------------------
1. Install Fedora Core 7
## NFS has to share /var/ftp/fedora7 folder
##DHCP config file notice
ddns-update-style none;
ignore client-updates;
allow booting;
allow bootp;
class "pxeclients" {
match if substring(option vendor-class-identifier, 0, 9) = "PXEClient";
next-server 192.10.0.1;
filename "linux-install/pxelinux.0";
}
subnet 192.10.0.0
netmask 255.255.255.0 {
range 192.10.0.150 192.10.0.180;
option broadcast-address 192.10.0.255;
option routers 192.10.0.1;
option subnet-mask 255.255.255.0;
}
Nagios installation and configuration tips
### Environment###
Client IP address: 10.6.116.59
Node1 (Server) IP address:
10.6.116.64
192.1.1.1
Node2 IP address: 192.1.1.2
################
[ipvsadm section]
tar zxvf ipvsadm-1.24.tar.gz
cd ipvsadm-1.24
Modify Makefile and libipvs/Makefile for /usr/src/linux/include to /usr/src/kernels/2.6.15xxx/include
make;make install
ipvsadm -C
ipvsadm -A -t 10.6.116.64:80 -s rr
ipvsadm -a -t 10.6.116.64:80 -r 192.1.1.2:80 -w 1
ipvsadm -a -t 10.6.116.64:80 -r 192.1.1.3:80 -w 2
ipvsadm -A -t 10.6.116.64:23
ipvsadm -a -t 10.6.116.64:23 -r 192.1.1.2:23 -w 1
ipvsadm -a -t 10.6.116.64:23 -r 192.1.1.3:23 -w 2
ipvsadm
[ab section]
cd /usr/local/apache2/bin
./ab -n 100 node3/
[webmin section]
tar zxvf webmin-1.300.tar.gz
cd webmin-1.300
./setup.sh /usr/local/webmin
[nagios section]
tar zxvf nagios-1.0.tar.gz
adduser nagios
passwd nagios
./configure
make all;make install
make install-init
make install-config
For /usr/local/apache2/conf/httpd.conf modification
######
## For Nagios Use Only##
######
Try it… http://localhost/nagios/
[nagiosplus section]
tar zxvf nagios-plugins-1.4.3.tar.gz
cd nagios-plugins-1.4.3/
./configure
make;make install
[nagios configuration]
cd /usr/local/nagios/etc
make all sample file to cfg file
all cfg file as notes, use minimal.cfg to be default
(cgi.cfgminimal.cfgnagios.cfgcheckcommands.cfgmiscommands.cfgresource.cfg)
Only need to modify the minimal.cfg file as followings
contact area
####
define contact{ contact_name juergen alias Juergen Chiu service_notification_period 24x7 host_notification_period 24x7 service_notification_options w,u,c,r host_notification_options d,r service_notification_commands notify-by-email host_notification_commands host-notify-by-email email juergen@localhost.localdomain }
####
contactgroup area
####
define contactgroup{ contactgroup_name Cluster-Manager alias Cluster Administrators members juergen }
####
host area
####
define host{ host_name node2 alias Cluster Server 2 address 192.1.1.2 check_command check-host-alive max_check_attempts 10 notification_interval 120 notification_period 24x7 notification_options d,r contact_groups Cluster-Manager }
####
hostgroup area
####
define hostgroup{ hostgroup_name Juergen alias Cluster Servers members node2,node3 }
####
service area
####
define service{ host_name node2 service_description HTTP is_volatile 0 check_period 24x7 max_check_attempts 3 normal_check_interval 3 retry_check_interval 1 contact_groups Cluster-Manager notification_interval 120 notification_period 24x7 notification_options w,u,c,r check_command check_http }
####
Modify cgi.cfg file for authentication (use_authentication=0)
Remark the checkcommands.cfg and misccommands.cfg line in nagios.cfg file
add the notes into minimal to add the check_http function
####
define command{ command_name check_http command_line $USER1$/check_http -H $HOSTADDRESS$ }
####
[nagios startup section]
cd /usr/local/nagios/bin
"./nagios -v ../etc/nagios.cfg" to check the config status
./nagios ../etc/nagios.cfg
MPICH2 briefly installation tips and howto to check
Needed Packages
1. mpich.tar.gz (http://www-unix.mcs.anl.gov/mpi/mpich2/downloads/mpich2-1.0.tar.gz)
2. RSH
3. NIS (ypserv)
Needed Daemon
1. nfs
2. netfs
3. network
4. nfs (server)
5. rstatd (for RPC)
6. portmap
7. rsh
8. xinetd
9. ypserv (server)
10. yppasswdd (server)
11. ypbind (client) <-- chkconfig ypbind on Installation tar zxvf mpich2.tar.gz ######### HOSTS ################## All /etc/hosts file in all client should contain all nodes information or it will fail. ######### mpich ################## use another user login and use these tools. Get into mpich directory ./configure --prefix=/home/hpcuser/mpich2 <-- not the same with the source folder make;make all;make install add "export PATH=/home/hpcuser/mpich2/bin/:$PATH" to ~/.bash_profile ######### mpd ################## cd $HOME touch .mpd.conf chmod 600 .mpd.conf add "secretword=111111" into this file #mpd& --> start the mpd daemon for mpiexec command.
You can test by "mpiexec -n 1 /bin/hostname" to see if you can run mpi2.
Or use "mpdallexit" to exit the mpd daemon.
######### RSH ##################
It used on client OS.
Open rsh daemon with xinetd service
modify PAM rule under /etc/pam.d/rsh
**remove the "pam_rhosts_auth" option
DON'T USE RSH AS ROOT!!!!!! (Permission Deny)
######### yp (NIS server) ##################
common settings
add "NISDOMAIN=hpcdomain" to /etc/sysconfig/network file
modify /etc/nsswitch passwd item to "nis files"
Server
add following items to /etc/ypserv.conf
127.0.0.0/255.255.255.0 :* :* :none
192.1.0.0/255.255.255.0 :* :* :none
add "/usr/lib/yp/ypinit -m" to /etc/rc.d/rc.local
add "/home (rw,sync)" to /etc/exports and do "/etc/rc.d/init.d/nfs reload"
add "/usr/local/src (rw,sync)" to /etc/exports and do "/etc/rc.d/init.d/nfs reload"
Client
add "domain pxe server 192.1.0.254" to /etc/yp.conf
add "/usr/lib/yp/ypinit -s pxe" to /etc/rc.d/rc.local
add "192.168.0.1:/home" to /etc/fstab
add "192.168.0.1:/usr/local/src" to /etc/fstab
add the mpi user's GID to /etc/group
*******************************************************
example command
cup stress
~/mpich/bin/mpirun -np 4 ~/mpich/mpe/contrib/life/life_g <-- make first, and type 100,1000 arter enter mpirun -np 2 ~/mpich/mpe/contrib/mandel/pmandel <-- xwin demo, "make" first (reference in README file) mpirun -np 4 PMB-MPI1 PingPong PingPing Sendrecv ********* Demo Used ********** cd ~/mpich/mpe ./configure --disable-checkMPI --disable-slog2 make all ~/mpich/examples/basic make mpirun -np 4 ./cpilog --> You will see all processes where they are.
~/mpich/examples/perftest
./configure
make all
MPICH installation and setting tips under Linux platform
Needed Packages
1. mpich.tar.gz (http://www-unix.mcs.anl.gov/mpi/mpich2/downloads/mpich2-1.0.tar.gz)
2. RSH
3. NIS (ypserv)
Needed Daemon
1. nfs
2. netfs
3. network
4. nfs (server)
5. rstatd (for RPC)
6. portmap
7. rsh
8. xinetd
9. ypserv (server)
10. yppasswdd (server)
11. ypbind (client) <-- chkconfig ypbind on Installation tar zxvf mpich.tar.gz ######### HOSTS ################## All /etc/hosts file in all client should contain all nodes information or it will fail. ######### mpich ################## use another user login and use these tools. Get into mpich directory ./configure make modify ($MPI_HOME)/util/machines/machines.LINUX to suit your client's hostname or FQDN. (These hostname should be included in /etc/hosts file) add "export PATH=/home/hpcuser/mpich/bin/:$PATH" to ~/.bash_profile ######### RSH ################## It used on client OS. Open rsh daemon with xinetd service modify PAM rule under /etc/pam.d/rsh **remove the "pam_rhosts_auth" option DON'T USE RSH AS ROOT!!!!!! (Permission Deny) ######### yp (NIS server) ################## common settings add "NISDOMAIN=hpcdomain" to /etc/sysconfig/network file modify /etc/nsswitch passwd item to "nis files" Server add following items to /etc/ypserv.conf 127.0.0.0/255.255.255.0 :* :* :none 192.1.0.0/255.255.255.0 :* :* :none add "/usr/lib/yp/ypinit -m" to /etc/rc.d/rc.local add "/home (rw,sync)" to /etc/exports and do "/etc/rc.d/init.d/nfs reload" add "/usr/local/src (rw,sync)" to /etc/exports and do "/etc/rc.d/init.d/nfs reload" Client add "domain pxe server 192.1.0.254" to /etc/yp.conf add "/usr/lib/yp/ypinit -s pxe" to /etc/rc.d/rc.local add "192.168.0.1:/home" to /etc/fstab add "192.168.0.1:/usr/local/src" to /etc/fstab add the mpi user's GID to /etc/group ******************************************************* example command cup stress ~/mpich/bin/mpirun -np 4 ~/mpich/mpe/contrib/life/life_g <-- make first, and type 100,1000 arter enter mpirun -np 2 ~/mpich/mpe/contrib/mandel/pmandel <-- xwin demo, "make" first (reference in README file) mpirun -np 4 PMB-MPI1 PingPong PingPing Sendrecv ********* Demo Used ********** cd ~/mpich/mpe ./configure --disable-checkMPI --disable-slog2 make all ~/mpich/examples/basic make mpirun -np 4 ./cpilog --> You will see all processes where they are.
~/mpich/examples/perftest
./configure
make all
Cluster manager tool usage and samba HA howto
#cluadmin
>service add
Service name: clusamba
Preferred member [None]: node2
Relocate when the preferred member joins the cluster (yes/no/?) [no]: yes
User script (e.g., /usr/foo/script or None) [None]:
Status check interval [0]: 90
Do you want to add an IP address to the service (yes/no/?) [no]: yes
IP Address Information
IP address: 10.1.1.254
Netmask (e.g. 255.255.255.0 or None) [None]:
Broadcast (e.g. X.Y.Z.255 or None) [None]:
Do you want to (a)dd, (m)odify, (d)elete or (s)how an IP address, or
are you (f)inished adding IP addresses [f]:
Do you want to add a disk device to the service (yes/no/?) [no]: yes
Disk Device Information
Device special file (e.g., /dev/sdb4): /dev/sdb1
Filesystem type (e.g., ext2, ext3 or None): ext2
Mount point (e.g., /usr/mnt/service1) [None]: /mnt
Mount options (e.g., rw,nosuid,sync): rw,nosuid,sync
Forced unmount support (yes/no/?) [yes]:
Would you like to allow NFS access to this filesystem (yes/no/?)\
[no]: no
Would you like to share to Windows clients (yes/no/?) [no]: yes
You will now be prompted for the Samba configuration:
Samba share name: clushare
The samba config file /etc/samba/smb.conf.clushare does not exist.
Would you like a default config file created (yes/no/?) [no]: yes
Successfully created /etc/samba/smb.conf.clushare.
Please remember to make necessary customizations and then copy the file
over to the other cluster member.
Do you want to (a)dd, (m)odify, (d)elete or (s)how DEVICES, or
are you (f)inished adding DEVICES [f]: f
name: clusamba
preferred node: node2
relocate: yes
user script: None
monitor interval: 90
IP address 0: 10.1.1.254
netmask 0: None
broadcast 0: None
device 0: /dev/sdb1
mount point, device 0: /mnt
mount fstype, device 0: ext2
mount options, device 0: rw,nosuid,sync
force unmount, device 0: yes
samba share, device 0: clushare
Add clusamba service as shown? (yes/no/?) yes
Test procedure:
You can reboot or shutdown one of these 2 nodes and observe the smb daemon in another node.
#smbclient -L 10.1.1.254
You have to see a sharename with "clushare" and Comment is "High Availability Samba Service" and done.
Reference site:
http://www.redhat.com/docs/manuals/enterprise/RHEL-AS-2.1-Manual/cluster-manager/s1-service-samba.html
>service add
Service name: clusamba
Preferred member [None]: node2
Relocate when the preferred member joins the cluster (yes/no/?) [no]: yes
User script (e.g., /usr/foo/script or None) [None]:
Status check interval [0]: 90
Do you want to add an IP address to the service (yes/no/?) [no]: yes
IP Address Information
IP address: 10.1.1.254
Netmask (e.g. 255.255.255.0 or None) [None]:
Broadcast (e.g. X.Y.Z.255 or None) [None]:
Do you want to (a)dd, (m)odify, (d)elete or (s)how an IP address, or
are you (f)inished adding IP addresses [f]:
Do you want to add a disk device to the service (yes/no/?) [no]: yes
Disk Device Information
Device special file (e.g., /dev/sdb4): /dev/sdb1
Filesystem type (e.g., ext2, ext3 or None): ext2
Mount point (e.g., /usr/mnt/service1) [None]: /mnt
Mount options (e.g., rw,nosuid,sync): rw,nosuid,sync
Forced unmount support (yes/no/?) [yes]:
Would you like to allow NFS access to this filesystem (yes/no/?)\
[no]: no
Would you like to share to Windows clients (yes/no/?) [no]: yes
You will now be prompted for the Samba configuration:
Samba share name: clushare
The samba config file /etc/samba/smb.conf.clushare does not exist.
Would you like a default config file created (yes/no/?) [no]: yes
Successfully created /etc/samba/smb.conf.clushare.
Please remember to make necessary customizations and then copy the file
over to the other cluster member.
Do you want to (a)dd, (m)odify, (d)elete or (s)how DEVICES, or
are you (f)inished adding DEVICES [f]: f
name: clusamba
preferred node: node2
relocate: yes
user script: None
monitor interval: 90
IP address 0: 10.1.1.254
netmask 0: None
broadcast 0: None
device 0: /dev/sdb1
mount point, device 0: /mnt
mount fstype, device 0: ext2
mount options, device 0: rw,nosuid,sync
force unmount, device 0: yes
samba share, device 0: clushare
Add clusamba service as shown? (yes/no/?) yes
Test procedure:
You can reboot or shutdown one of these 2 nodes and observe the smb daemon in another node.
#smbclient -L 10.1.1.254
You have to see a sharename with "clushare" and Comment is "High Availability Samba Service" and done.
Reference site:
http://www.redhat.com/docs/manuals/enterprise/RHEL-AS-2.1-Manual/cluster-manager/s1-service-samba.html
訂閱:
文章 (Atom)