download the file: http://jas.gemnetworks.com/debian/po...19-1_amd64.deb
sudo apt-get install linux-headers-generic build-essential dkms
then install the debian package
but you need to install the following stuffs for 13.04
- linux-headers-generic
- bcmwl-kernel-source
then you can use wifi!
ps: This document is just integrate some contents from the other sites.
星期一, 5月 27, 2013

星期二, 3月 13, 2012
My ubuntu (11.10 Oneiric) on ASUS U41S
I bought a laptop,ASUS U41S, and installed ubuntu 11.10 on it. But found out many issues and record how to fix it listed below. The solution are from my experiences, many links (googling) and references, just integrate all fixes here. Not sure can fit all people using ubuntu on asus.
1. Fan Speed control.
When I power on my laptop with Ubuntu, the fan speed always (or usually) make lots of noises. Then I find a way to make it being quieter, that's lm_sensors. (but maybe still need to refer to power consumption as item 2.)
- Install lm-sensors
2. power consumption (2.5 hrs to 6 hrs)
- Enable ACPI ASPM
edit /etc/default/grub and add pcie_aspm=force
update-grub
#The major eating-power-monster will be the nvidia and unity3D with compiz, so change to 2D first.
- About acpi_call
git clone http://github.com/mkottman/acpi_call.git
cd acpi_call
make
sudo insmod acpi_call.ko # first trying
--> then copy acpi_call.ko to /lib/module/... and depmod -a
./test_off.sh # you can use this script to find out your "parameter" of acpi_call to disable the nvidia h/w
*** build acpi_call in dkms format under 12.10 ***
apt-get install dkms
put acpi_call folder into /usr/src/acpi_call-0.1
modify Makefile and dkms.conf
Makefile
obj-m := acpi_call.o default: $(MAKE) -C $(KDIR) SUBDIRS=$(PWD) modules clean: rm acpi_call.mod.o acpi_call.o acpi_call.ko
dkms.conf
build dkms format
(can check the status with "dkms status" command)
and here is the link for reference.
https://wiki.ubuntu.com/Kernel/Dev/DKMSPackaging
http://hybrid-graphics-linux.tuxfamily.org/index.php?title=Acpi_call
---- save these in /etc/rc.local -----
# remove nouveau for nvidia before X
modprobe -r nouveau
# Disable nvidia h/w
modprobe acpi_call
echo "\_SB.PCI0.PEG0.GFX0.DOFF" > /proc/acpi/call
#then reboot, you should have more than 5 hrs power consumption now.
3. Suspend issue (can't fix hibernate yet)
From the solution, looks like the issue caused by usb.
- add the contents below into /etc/pm/sleep.d/20_suspend and chmod to 755
#!/bin/sh
#inspired by http://art.ubuntuforums.org/showpost.php?p=9744970&postcount=19
#...and http://thecodecentral.com/2011/01/18/fix-ubuntu-10-10-suspendhibernate-not-working-bug
# tidied by tqzzaa :)
VERSION=1.1
DEV_LIST=/tmp/usb-dev-list
DRIVERS_DIR=/sys/bus/pci/drivers
DRIVERS="ehci xhci" # ehci_hcd, xhci_hcd
HEX="[[:xdigit:]]"
MAX_BIND_ATTEMPTS=2
BIND_WAIT=0.1
unbindDev() {
echo -n > $DEV_LIST 2>/dev/null
for driver in $DRIVERS; do
DDIR=$DRIVERS_DIR/${driver}_hcd
for dev in `ls $DDIR 2>/dev/null | egrep "^$HEX+:$HEX+:$HEX"`; do
echo -n "$dev" > $DDIR/unbind
echo "$driver $dev" >> $DEV_LIST
done
done
}
bindDev() {
if [ -s $DEV_LIST ]; then
while read driver dev; do
DDIR=$DRIVERS_DIR/${driver}_hcd
while [ $((MAX_BIND_ATTEMPTS)) -gt 0 ]; do
echo -n "$dev" > $DDIR/bind
if [ ! -L "$DDIR/$dev" ]; then
sleep $BIND_WAIT
else
break
fi
MAX_BIND_ATTEMPTS=$((MAX_BIND_ATTEMPTS-1))
done
done < $DEV_LIST
fi
rm $DEV_LIST 2>/dev/null
}
case "$1" in
hibernate|suspend) unbindDev;;
resume|thaw) bindDev;;
esac
1. Fan Speed control.
When I power on my laptop with Ubuntu, the fan speed always (or usually) make lots of noises. Then I find a way to make it being quieter, that's lm_sensors. (but maybe still need to refer to power consumption as item 2.)
- Install lm-sensors
2. power consumption (2.5 hrs to 6 hrs)
- Enable ACPI ASPM
edit /etc/default/grub and add pcie_aspm=force
update-grub
#The major eating-power-monster will be the nvidia and unity3D with compiz, so change to 2D first.
- About acpi_call
git clone http://github.com/mkottman/acpi_call.git
cd acpi_call
make
sudo insmod acpi_call.ko # first trying
--> then copy acpi_call.ko to /lib/module/... and depmod -a
./test_off.sh # you can use this script to find out your "parameter" of acpi_call to disable the nvidia h/w
*** build acpi_call in dkms format under 12.10 ***
apt-get install dkms
put acpi_call folder into /usr/src/acpi_call-0.1
modify Makefile and dkms.conf
Makefile
obj-m := acpi_call.o default: $(MAKE) -C $(KDIR) SUBDIRS=$(PWD) modules clean: rm acpi_call.mod.o acpi_call.o acpi_call.ko
dkms.conf
PACKAGE_NAME="acpi_call"
PACKAGE_VERSION="0.1"
CLEAN="make clean"
BUILT_MODULE_NAME[0]="acpi_call"
DEST_MODULE_NAME[0]="acpi_call"
MAKE[0]="make IGNORE_CC_MISMATCH=1 KDIR=$kernel_source_dir PWD=$dkms_tree/acpi_call/0.1/build"
DEST_MODULE_LOCATION[0]="/kernel/drivers/acpi"
AUTOINSTALL="yes"
build dkms format
sudo dkms add -m acpi_call -v 0.1
sudo dkms build -m acpi_call -v 0.1
sudo dkms install -m acpi_call -v 0.1
(can check the status with "dkms status" command)
and here is the link for reference.
https://wiki.ubuntu.com/Kernel/Dev/DKMSPackaging
http://hybrid-graphics-linux.tuxfamily.org/index.php?title=Acpi_call
---- save these in /etc/rc.local -----
# remove nouveau for nvidia before X
modprobe -r nouveau
# Disable nvidia h/w
modprobe acpi_call
echo "\_SB.PCI0.PEG0.GFX0.DOFF" > /proc/acpi/call
#then reboot, you should have more than 5 hrs power consumption now.
3. Suspend issue (can't fix hibernate yet)
From the solution, looks like the issue caused by usb.
- add the contents below into /etc/pm/sleep.d/20_suspend and chmod to 755
#!/bin/sh
#inspired by http://art.ubuntuforums.org/showpost.php?p=9744970&postcount=19
#...and http://thecodecentral.com/2011/01/18/fix-ubuntu-10-10-suspendhibernate-not-working-bug
# tidied by tqzzaa :)
VERSION=1.1
DEV_LIST=/tmp/usb-dev-list
DRIVERS_DIR=/sys/bus/pci/drivers
DRIVERS="ehci xhci" # ehci_hcd, xhci_hcd
HEX="[[:xdigit:]]"
MAX_BIND_ATTEMPTS=2
BIND_WAIT=0.1
unbindDev() {
echo -n > $DEV_LIST 2>/dev/null
for driver in $DRIVERS; do
DDIR=$DRIVERS_DIR/${driver}_hcd
for dev in `ls $DDIR 2>/dev/null | egrep "^$HEX+:$HEX+:$HEX"`; do
echo -n "$dev" > $DDIR/unbind
echo "$driver $dev" >> $DEV_LIST
done
done
}
bindDev() {
if [ -s $DEV_LIST ]; then
while read driver dev; do
DDIR=$DRIVERS_DIR/${driver}_hcd
while [ $((MAX_BIND_ATTEMPTS)) -gt 0 ]; do
echo -n "$dev" > $DDIR/bind
if [ ! -L "$DDIR/$dev" ]; then
sleep $BIND_WAIT
else
break
fi
MAX_BIND_ATTEMPTS=$((MAX_BIND_ATTEMPTS-1))
done
done < $DEV_LIST
fi
rm $DEV_LIST 2>/dev/null
}
case "$1" in
hibernate|suspend) unbindDev;;
resume|thaw) bindDev;;
esac
星期二, 2月 21, 2012
星期四, 1月 12, 2012
Why you cannot make your command or parameter complete by pushing TAB under Ubuntu
Just find out the package name for this function, and keep this info here in case forget this name.
*bash-completion
Who enable this function? The answer is bash script.
1. ~/.bashrc
2. /etc/profile
You can also check which package support this or program it by yourself.
/etc/bash_completion.d
*bash-completion
Who enable this function? The answer is bash script.
1. ~/.bashrc
2. /etc/profile
You can also check which package support this or program it by yourself.
/etc/bash_completion.d
星期一, 5月 09, 2011
Adobe Reader cht fontpack for Ubuntu
- Install adobereader 9 in s/w center
- download the fontpack from [1]
- unpack the fontpack and execute the INSTALL file
- Done
[1] ftp://ftp.adobe.com/pub/adobe/reader/unix/9.x/9.1/misc/
- download the fontpack from [1]
- unpack the fontpack and execute the INSTALL file
- Done
[1] ftp://ftp.adobe.com/pub/adobe/reader/unix/9.x/9.1/misc/
星期一, 7月 26, 2010
How to change the "indicator" default setting, like mail agent
There is no setting option in gconf-editor or panel properties.
But you can just use the file to change the preferred application.
- In /usr/share/indicators/messages/applications/ there are some files, like empathy/evolution/gwibber in my folder by default.
- You can add a "thunderbird" file.
- And add a line in it as "/usr/share/applications/thunderbird.desktop".
- Then~~~you will see the indicator show you "Mozilla Thunderbird" dynamically.
But you can just use the file to change the preferred application.
- In /usr/share/indicators/messages/applications/ there are some files, like empathy/evolution/gwibber in my folder by default.
- You can add a "thunderbird" file.
- And add a line in it as "/usr/share/applications/thunderbird.desktop".
- Then~~~you will see the indicator show you "Mozilla Thunderbird" dynamically.
星期五, 7月 23, 2010
Enable/Calibrate touch screen on EeeTop ET1602 for Ubuntu 10.04 (Lucid)
Have a chance to port Lucid on the EeeTop machine. There are some problems in touchscreen and resolution, and here is how to fix it.
1. touchscreen
In Lucid, evdev is the default driver for X input devices, but it's not useful for this type machine. So you need to install the "evtouch" driver, the package name is "xserver-xorg-input-evtouch".
aptitude install xserver-xorg-input-evtouch
Then you need to modify the default xorg.conf (create a new one under /etc/X11/), and below is the details.
--------------------------
Section "ServerLayout"
Identifier "Default Serverlayout"
Screen 0 "Default Screen" 0 0
InputDevice "Touch0"
EndSection
Section "Device"
Identifier "Configured Video Device"
Driver "intel"
Option "monitor-VGA" "VGA"
Option "monitor-VGA1" "VGA1"
Option "NoDCC"
Option "FramebufferCompression" "off"
EndSection
Section "InputDevice"
Identifier "Touch0"
Driver "evtouch"
Option "device" "/dev/input/evtouch"
Option "MinX" "1"
Option "MinY" "1"
Option "MaxX" "4096"
Option "MaxY" "4096"
Option "ReportingMode" "Raw"
Option "Emulate3Buttons" "false"
Option "Emulate3Timeout" "50"
Option "SendCoreEvents" "on"
Option "MoveLimit" "0"
EndSection
Section "Monitor"
Identifier "VGA"
ModeLine "1366x768" 85.600 1366 1430 1542 1798 768 771 777 795 +hsync +vsync
EndSection
Section "Monitor"
Identifier "VGA1"
ModeLine "1366x768" 85.600 1366 1430 1542 1798 768 771 777 795 +hsync +vsync
EndSection
Section "Monitor"
Identifier "Configured Monitor"
ModeLine "1366x768" 85.600 1366 1430 1542 1798 768 771 777 795 +hsync +vsync
EndSection
Section "Screen"
Identifier "Default Screen"
Monitor "Configured Monitor"
Device "Configured Video Device"
DefaultDepth 24
Subsection "Display"
Modes "1366x768"
EndSubsection
EndSection
--------------------------
And also need to add "69-touchscreen.rules" udev rule under /etc/udev/rules.d
notes: check sysfs by the command
udevadm info -ap /sys/class/input/event8
--------------------------
KERNEL=="event*", SUBSYSTEM=="input", ATTRS{idVendor}=="1bfd", ATTRS{idProduct}=="1688", SYMLINK+="input/evtouch"
--------------------------
BTW, explain how I have the right "ModeLine" parameters here.
We can use the "PowerStrip" tool (Windows tool) to have the values.
Below is the link to teach you how to get the right values by PowerStrip.
http://www.x.org/wiki/FAQVideoModes#ObtainingmodelinesfromWindowsprogramPowerStrip
1. touchscreen
In Lucid, evdev is the default driver for X input devices, but it's not useful for this type machine. So you need to install the "evtouch" driver, the package name is "xserver-xorg-input-evtouch".
aptitude install xserver-xorg-input-evtouch
Then you need to modify the default xorg.conf (create a new one under /etc/X11/), and below is the details.
--------------------------
Section "ServerLayout"
Identifier "Default Serverlayout"
Screen 0 "Default Screen" 0 0
InputDevice "Touch0"
EndSection
Section "Device"
Identifier "Configured Video Device"
Driver "intel"
Option "monitor-VGA" "VGA"
Option "monitor-VGA1" "VGA1"
Option "NoDCC"
Option "FramebufferCompression" "off"
EndSection
Section "InputDevice"
Identifier "Touch0"
Driver "evtouch"
Option "device" "/dev/input/evtouch"
Option "MinX" "1"
Option "MinY" "1"
Option "MaxX" "4096"
Option "MaxY" "4096"
Option "ReportingMode" "Raw"
Option "Emulate3Buttons" "false"
Option "Emulate3Timeout" "50"
Option "SendCoreEvents" "on"
Option "MoveLimit" "0"
EndSection
Section "Monitor"
Identifier "VGA"
ModeLine "1366x768" 85.600 1366 1430 1542 1798 768 771 777 795 +hsync +vsync
EndSection
Section "Monitor"
Identifier "VGA1"
ModeLine "1366x768" 85.600 1366 1430 1542 1798 768 771 777 795 +hsync +vsync
EndSection
Section "Monitor"
Identifier "Configured Monitor"
ModeLine "1366x768" 85.600 1366 1430 1542 1798 768 771 777 795 +hsync +vsync
EndSection
Section "Screen"
Identifier "Default Screen"
Monitor "Configured Monitor"
Device "Configured Video Device"
DefaultDepth 24
Subsection "Display"
Modes "1366x768"
EndSubsection
EndSection
--------------------------
And also need to add "69-touchscreen.rules" udev rule under /etc/udev/rules.d
notes: check sysfs by the command
udevadm info -ap /sys/class/input/event8
--------------------------
KERNEL=="event*", SUBSYSTEM=="input", ATTRS{idVendor}=="1bfd", ATTRS{idProduct}=="1688", SYMLINK+="input/evtouch"
--------------------------
BTW, explain how I have the right "ModeLine" parameters here.
We can use the "PowerStrip" tool (Windows tool) to have the values.
Below is the link to teach you how to get the right values by PowerStrip.
http://www.x.org/wiki/FAQVideoModes#ObtainingmodelinesfromWindowsprogramPowerStrip
星期一, 3月 15, 2010
Some Linux tips
1. share the shell screen
user a# screen -S test
user b# screen -x test
then both a and b can use the shared shell screen to watch the status.
2. how to show your IP address (a little boring and stupid...^^)
ifconfig | grep "eth0" -A 1|sed '1d'|awk '{print $2}'|awk -F: '{print $2}'
3. how to show your VGA driver name (still need to see /var/log/Xorg.0.log for details)
lspci -v|grep VGA -A 10|grep modules
4. How to clean all gnome panel applet default settings
gconftool-2 --recursive-unset /apps/panel
kill gnome-panel --> it will make gnome-panel refresh again.
-- Need to maintain ---
user a# screen -S test
user b# screen -x test
then both a and b can use the shared shell screen to watch the status.
2. how to show your IP address (a little boring and stupid...^^)
ifconfig | grep "eth0" -A 1|sed '1d'|awk '{print $2}'|awk -F: '{print $2}'
3. how to show your VGA driver name (still need to see /var/log/Xorg.0.log for details)
lspci -v|grep VGA -A 10|grep modules
4. How to clean all gnome panel applet default settings
gconftool-2 --recursive-unset /apps/panel
kill gnome-panel --> it will make gnome-panel refresh again.
-- Need to maintain ---
星期三, 11月 18, 2009
Linux sound architecture - pulseaudio/alsa/codecs
Below is the processes of sound architecture what I know.
Only base on alsa architecture, and be aware OSS is not supported by Linux anymore.
*recording
mic --> audio codec --> audio codec interface (snd_hda_codec) --> alsa kernel driver --> /dev/snd/* --> alsa api --> alsa lib (you can have the different recording type here) --> sound recorder
*playing
totem --> gstreamer --> pulseaudio --> alsa lib --> alsa api --> alsa kernel --> /dev/snd/* --> alsa kernel driver --> audio controller driver --> audio controller --> speaker
** Vocabulary **
gstreamer : for some codecs that default doesn't support, like mp3 or divx.
alsa kernel driver : like soundcore, snd, snd_pcm, snd_timer...etc
audio controller driver : snd_hda_intel
audio codec interface : snd_hda_codec
** notes **
gnome-sound-recorder only support ogg and wav
packages:
helix for realplayer (non-free), and will touch the alsa lib directly.
gstreamer for the others free audio codecs, below lists the main packages.
-gst-plugins-base
contains a basic set of well-supported plug-ins
-gst-plugins-ugly
contains a set of well-supported plug-ins, but might pose problems for distributors
-gst-plugins-bad
contains a set of less supported plug-ins that haven't passed the rigorous quality testing we expect
Only base on alsa architecture, and be aware OSS is not supported by Linux anymore.
*recording
mic --> audio codec --> audio codec interface (snd_hda_codec) --> alsa kernel driver --> /dev/snd/* --> alsa api --> alsa lib (you can have the different recording type here) --> sound recorder
*playing
totem --> gstreamer --> pulseaudio --> alsa lib --> alsa api --> alsa kernel --> /dev/snd/* --> alsa kernel driver --> audio controller driver --> audio controller --> speaker
** Vocabulary **
gstreamer : for some codecs that default doesn't support, like mp3 or divx.
alsa kernel driver : like soundcore, snd, snd_pcm, snd_timer...etc
audio controller driver : snd_hda_intel
audio codec interface : snd_hda_codec
** notes **
gnome-sound-recorder only support ogg and wav
packages:
helix for realplayer (non-free), and will touch the alsa lib directly.
gstreamer for the others free audio codecs, below lists the main packages.
-gst-plugins-base
contains a basic set of well-supported plug-ins
-gst-plugins-ugly
contains a set of well-supported plug-ins, but might pose problems for distributors
-gst-plugins-bad
contains a set of less supported plug-ins that haven't passed the rigorous quality testing we expect
星期二, 11月 10, 2009
tips or useful diag tools under Linux
* audio
audacity -- professional audio editor
(help to see the audio wave pattern or spectrum)
amixer -- command line mixer tuning program
(another is alsamixer in GUI mode)
arecord -- alsa command line audio recording program
*video
glxgears -- 3D testing tool
(quick to figure out the 3D performance)
xrandr -- command line interface to check and use the video port
(can check the all connecting video interface and output the video signal to dedicate device)
audacity -- professional audio editor
(help to see the audio wave pattern or spectrum)
amixer -- command line mixer tuning program
(another is alsamixer in GUI mode)
arecord -- alsa command line audio recording program
*video
glxgears -- 3D testing tool
(quick to figure out the 3D performance)
xrandr -- command line interface to check and use the video port
(can check the all connecting video interface and output the video signal to dedicate device)
星期五, 10月 02, 2009
where is the Firefox default settings, like cookies
In /home/username/.mozilla/firefox there has a file named "profiles.ini".
This file contains the [Profile0], and that defines which folder will be used for default settings, use "abc" to be example.
That means /home/username/.mozilla/firefox/abc will have lots of files about the firefox settings.
Like cookies, the file is "cookies.sqlite".
This file contains the [Profile0], and that defines which folder will be used for default settings, use "abc" to be example.
That means /home/username/.mozilla/firefox/abc will have lots of files about the firefox settings.
Like cookies, the file is "cookies.sqlite".
星期五, 7月 03, 2009
Useful deploy tool -- DRBL (Clonezilla SE)
My environment is Ubuntu jaunty (9.04).
sudo aptitude install nis dhcp3-server tftpd
sudo ifconfig eth0:1 192.168.0.1 (when system only has 1 nic port)
# import gpg key
wget -q http://drbl.sourceforge.net/GPG-KEY-DRBL -O- | sudo apt-key add -
# add following line into source list
# then aptitude update and install drbl
deb http://drbl.sourceforge.net/drbl-core drbl stable testing unstable
# For setting up system environment, here has lots of setting, and choose which IP to be the PXE interface should be the most important portion.
sudo /opt/drbl/sbin/drblsrv -i
sudo /opt/drbl/sbin/drblpush -i
-----------------------------------
# start to use clonezilla
sudo /opt/drbl/sbin/dcs
# clone the client image
All --> clonezilla-start --> Beginner --> save-disk
# restore the local image to the client
All --> clonezilla-start --> Beginner --> restore-disk
Now you can boot up your client, then it will show you the GRUB menu with deploy option.
sudo aptitude install nis dhcp3-server tftpd
sudo ifconfig eth0:1 192.168.0.1 (when system only has 1 nic port)
# import gpg key
wget -q http://drbl.sourceforge.net/GPG-KEY-DRBL -O- | sudo apt-key add -
# add following line into source list
# then aptitude update and install drbl
deb http://drbl.sourceforge.net/drbl-core drbl stable testing unstable
# For setting up system environment, here has lots of setting, and choose which IP to be the PXE interface should be the most important portion.
sudo /opt/drbl/sbin/drblsrv -i
sudo /opt/drbl/sbin/drblpush -i
-----------------------------------
# start to use clonezilla
sudo /opt/drbl/sbin/dcs
# clone the client image
All --> clonezilla-start --> Beginner --> save-disk
# restore the local image to the client
All --> clonezilla-start --> Beginner --> restore-disk
Now you can boot up your client, then it will show you the GRUB menu with deploy option.
星期一, 6月 15, 2009
Change wireless on/off status in general user mode
list some different ways, but need to verify by yourself carefully.
1. silly way....killall nm-applet
2. /etc/acpi/wireless.sh
3. script file by Paul Liu
For old/new version (remark lines are for old version)
#!/bin/sh
#dbus-send --system --type=method_call \
# --dest=org.freedesktop.NetworkManager \
# /org/freedesktop/NetworkManager \
# org.freedesktop.NetworkManager.setWirelessEnabled \
# boolean:false
#dbus-send --system --print-reply --type=method_call \
# --dest=org.freedesktop.NetworkManager \
# /org/freedesktop/NetworkManager \
# org.freedesktop.NetworkManager.getWirelessEnabled
STAT=`dbus-send --system --print-reply --type=method_call \
--dest=org.freedesktop.NetworkManager \
/org/freedesktop/NetworkManager \
org.freedesktop.DBus.Properties.Get \
string:org.freedesktop.NetworkManager \
string:WirelessEnabled | grep variant | awk '{ print $3 }'`
case "$STAT" in
true)
NEWSTAT="false"
;;
*)
NEWSTAT="true"
;;
esac
dbus-send --system --type=method_call \
--dest=org.freedesktop.NetworkManager \
/org/freedesktop/NetworkManager \
org.freedesktop.DBus.Properties.Set \
string:org.freedesktop.NetworkManager \
string:WirelessEnabled variant:boolean:$NEWSTAT
1. silly way....killall nm-applet
2. /etc/acpi/wireless.sh
3. script file by Paul Liu
For old/new version (remark lines are for old version)
#!/bin/sh
#dbus-send --system --type=method_call \
# --dest=org.freedesktop.NetworkManager \
# /org/freedesktop/NetworkManager \
# org.freedesktop.NetworkManager.setWirelessEnabled \
# boolean:false
#dbus-send --system --print-reply --type=method_call \
# --dest=org.freedesktop.NetworkManager \
# /org/freedesktop/NetworkManager \
# org.freedesktop.NetworkManager.getWirelessEnabled
STAT=`dbus-send --system --print-reply --type=method_call \
--dest=org.freedesktop.NetworkManager \
/org/freedesktop/NetworkManager \
org.freedesktop.DBus.Properties.Get \
string:org.freedesktop.NetworkManager \
string:WirelessEnabled | grep variant | awk '{ print $3 }'`
case "$STAT" in
true)
NEWSTAT="false"
;;
*)
NEWSTAT="true"
;;
esac
dbus-send --system --type=method_call \
--dest=org.freedesktop.NetworkManager \
/org/freedesktop/NetworkManager \
org.freedesktop.DBus.Properties.Set \
string:org.freedesktop.NetworkManager \
string:WirelessEnabled variant:boolean:$NEWSTAT
星期四, 6月 11, 2009
how to build a debian package (.deb)
need some packages first
dh-make
build-essential
devscripts
pbuilder
cdbs
00 change the changelog and control file to be your own files, it will be authorize through internet.
1. create a test folder
2. in test folder create a project-version folder (like abc-1.1)
3. in abc-1.1 folder, exec "dh_make native" and select "s" option
4. then we have "debian" folder there, inside has example files
** replace some files **
5. in abc-1.1 folder, create etc/pm/config.d/unload file
6. in debian folder, create a file named "install"
7. add "etc/pm/config.d/unload /etc/pm/config.d" in replace file.
*** script file ***
8. add your script into postinst file (you can remove all *.ex file, only left one for modifying.)
9. script better includes #!/bin/bash
10. back to abc-1.1 folder, and run "debuild -i -I -sa" or try this "debuild -us -uc -b"
list some example files.
changelog:
minix-config (1.1) jaunty; urgency=low
* update for ppa
-- Juergen Chiu Thu, 11 Jun 2009 10:38:49 +0000
postinst:
#!/bin/sh
set -e
#Sound
amixer sset "Input Source" "Front Mic"
amixer -q set "Front Mic" 0% unmute
amixer -q set "Front Mic Boost" 10% unmute
amixer -q set "Capture" 100% unmute
#DEBHELPER#
rules:
#!/usr/bin/make -f
include /usr/share/cdbs/1/rules/debhelper.mk
binary-install/minix-config::
install -d $(CURDIR)/debian/minix-config/etc/pm/config.d/
install -m 644 $(CURDIR)/etc/pm/config.d/10minix_module $(CURDIR)/debian/minix-config/etc/pm/config.d/
binary-fixup/minix-config::
dh_gconf --priority=16
dh-make
build-essential
devscripts
pbuilder
cdbs
00 change the changelog and control file to be your own files, it will be authorize through internet.
1. create a test folder
2. in test folder create a project-version folder (like abc-1.1)
3. in abc-1.1 folder, exec "dh_make native" and select "s" option
4. then we have "debian" folder there, inside has example files
** replace some files **
5. in abc-1.1 folder, create etc/pm/config.d/unload file
6. in debian folder, create a file named "install"
7. add "etc/pm/config.d/unload /etc/pm/config.d" in replace file.
*** script file ***
8. add your script into postinst file (you can remove all *.ex file, only left one for modifying.)
9. script better includes #!/bin/bash
10. back to abc-1.1 folder, and run "debuild -i -I -sa" or try this "debuild -us -uc -b"
list some example files.
changelog:
minix-config (1.1) jaunty; urgency=low
* update for ppa
-- Juergen Chiu
postinst:
#!/bin/sh
set -e
#Sound
amixer sset "Input Source" "Front Mic"
amixer -q set "Front Mic" 0% unmute
amixer -q set "Front Mic Boost" 10% unmute
amixer -q set "Capture" 100% unmute
#DEBHELPER#
rules:
#!/usr/bin/make -f
include /usr/share/cdbs/1/rules/debhelper.mk
binary-install/minix-config::
install -d $(CURDIR)/debian/minix-config/etc/pm/config.d/
install -m 644 $(CURDIR)/etc/pm/config.d/10minix_module $(CURDIR)/debian/minix-config/etc/pm/config.d/
binary-fixup/minix-config::
dh_gconf --priority=16
星期二, 4月 21, 2009
ALC662錄音的問題 (Intel 82801G)
在試ALC662 chipset時...發現不能錄音
一開始找不出問題
但後來發現原來是因為mic的回朔太大聲, 造成錄音無法正常運作
若使用alsa內建的指令錄音, 就都沒有問題
相關用到的指令如下
alsamixer
asoundconf set-default-card 0 (do this only when alsamixer has trouble)
aplay -l
arecord -f cd -t wav -d 5 test.wav
aplay test.wav
好用的測試聲音小工具
xoscope
還是用指令比較保險
最後....
在Volume Control/options/input srouce change to front Mic (system use front mic to be default)
and...壓低front mic與front mic boost的音量....
目前看到多一個問題,ogg type不能使用,換成wave type就好了
可以用下面方式解決
gstreamer-properties程式把原本的input plugin從"alsa"轉為"OSS"
參考用的command, 可直接修改聲音的設定
amixer sset "Input Source" "Front Mic"
amixer -q set "Front Mic" 50% unmute
...
一開始找不出問題
但後來發現原來是因為mic的回朔太大聲, 造成錄音無法正常運作
若使用alsa內建的指令錄音, 就都沒有問題
相關用到的指令如下
alsamixer
asoundconf set-default-card 0 (do this only when alsamixer has trouble)
aplay -l
arecord -f cd -t wav -d 5 test.wav
aplay test.wav
好用的測試聲音小工具
xoscope
還是用指令比較保險
最後....
在Volume Control/options/input srouce change to front Mic (system use front mic to be default)
and...壓低front mic與front mic boost的音量....
目前看到多一個問題,ogg type不能使用,換成wave type就好了
可以用下面方式解決
gstreamer-properties程式把原本的input plugin從"alsa"轉為"OSS"
參考用的command, 可直接修改聲音的設定
amixer sset "Input Source" "Front Mic"
amixer -q set "Front Mic" 50% unmute
...
星期三, 4月 15, 2009
How to change keycode or keybinding behavior
You can check whole hot key architecture here.
https://wiki.ubuntu.com/Hotkeys/Architecture
* Relative commands
1. input-utils package
a. lsinput: shows some information about each input device the kernel reports. This is useful to make sure you have the right device number for other testing.
b. input-events: tell you the events passing through the queue for any device
c. input-kbd: show you the keymap available for any device that provides keyboard events
2. acpi_listen: listen to acpi channel if the keycode send to acpi.
3. showkey : show the keycodes by -k and scancodes by -s parameter.
4. xev : show the key symbol in X environment like below.
5. xmodmap : GNOME mapping table
KeyRelease event, serial 33, synthetic NO, window 0x4400001,
. root 0x13b, subw 0x0, time 9487761, (321,324), root:(399,415), state 0x0, keycode 23 (keysym 0xff09, Tab), same_screen YES, XLookupString gives 1 bytes: (09) " " XFilterEvent returns: False
*How to find out the root cause of hot key
For kernel clarification
1. use "lsinput" to check which device file you used.
2. use "input-events 4" to listen if kernel get the right signal from device (4 means /dev/input/event"4")
For acpi clarification
3. excute "#showkey -s" to capture the keyboard signal.
4. Check the scancodes and refer to /usr/includes/linux/input.h file.
5. check the keycodes definition in /usr/share/acpi-support/key-constants
6. check the scripts file for acpi event in /etc/acpi/*.sh
7. you can use acpi-fakekey to simulate the keycode.
For GNOME system
8. use "xmodmap -pke" to check the key map
9. use "xev" to see which keycode or behavior under GNOME
10. Or you can use "gnome-keybinding-properties" to check the GNOME keybinding status.
============
gnome-keybinding-properties save the system default setting in following path
/var/lib/gconf/debian.defaults/%gconf-tree.xml
and save the user settings in
/home/juergen/.gconf/desktop/gnome/keybindings/"your-key-name"/%gconf.xml
============
---------------------------------------------------------------------------
For example: 0xe0 0x20 for fn-f9 audio mute binding code by showkey -s
xmodmap -pke (look for the available keycode number)
less /usr/share/X11/XKeysymDB (check which X Window default function)
setkeycodes e020 255 (that means keycode 255 will be 0xe0 0x20, change keybinding to keycode.)
For example: change keybinding 121->mute to 113->mute
$sudo xmodmap -e "keycode 113 = XF86AudioMute"
$xmodmap -pke | grep 113
For example: for acpi event
when acpi script needs 121 to mute, but mute button is 113.
add "$setkeycodes e020 121" to /etc/event.d/rc2 script section before exec line.
reboot and mute function keycode will change to 121.
modify /usr/share/acpi-support/key-constants 113 to 121
refer to the page
http://darkknight9.blogspot.com/2005/08/custom-keybinding-gnome.html
"Application/System Tools/Configuration Editor" for metacity "keybindings" function.
https://wiki.ubuntu.com/Hotkeys/Architecture
* Relative commands
1. input-utils package
a. lsinput: shows some information about each input device the kernel reports. This is useful to make sure you have the right device number for other testing.
b. input-events: tell you the events passing through the queue for any device
c. input-kbd: show you the keymap available for any device that provides keyboard events
2. acpi_listen: listen to acpi channel if the keycode send to acpi.
3. showkey : show the keycodes by -k and scancodes by -s parameter.
4. xev : show the key symbol in X environment like below.
5. xmodmap : GNOME mapping table
KeyRelease event, serial 33, synthetic NO, window 0x4400001,
. root 0x13b, subw 0x0, time 9487761, (321,324), root:(399,415), state 0x0, keycode 23 (keysym 0xff09, Tab), same_screen YES, XLookupString gives 1 bytes: (09) " " XFilterEvent returns: False
*How to find out the root cause of hot key
For kernel clarification
1. use "lsinput" to check which device file you used.
2. use "input-events 4" to listen if kernel get the right signal from device (4 means /dev/input/event"4")
For acpi clarification
3. excute "#showkey -s" to capture the keyboard signal.
4. Check the scancodes and refer to /usr/includes/linux/input.h file.
5. check the keycodes definition in /usr/share/acpi-support/key-constants
6. check the scripts file for acpi event in /etc/acpi/*.sh
7. you can use acpi-fakekey to simulate the keycode.
For GNOME system
8. use "xmodmap -pke" to check the key map
9. use "xev" to see which keycode or behavior under GNOME
10. Or you can use "gnome-keybinding-properties" to check the GNOME keybinding status.
============
gnome-keybinding-properties save the system default setting in following path
/var/lib/gconf/debian.defaults/%gconf-tree.xml
and save the user settings in
/home/juergen/.gconf/desktop/gnome/keybindings/"your-key-name"/%gconf.xml
============
---------------------------------------------------------------------------
For example: 0xe0 0x20 for fn-f9 audio mute binding code by showkey -s
xmodmap -pke (look for the available keycode number)
less /usr/share/X11/XKeysymDB (check which X Window default function)
setkeycodes e020 255 (that means keycode 255 will be 0xe0 0x20, change keybinding to keycode.)
For example: change keybinding 121->mute to 113->mute
$sudo xmodmap -e "keycode 113 = XF86AudioMute"
$xmodmap -pke | grep 113
For example: for acpi event
when acpi script needs 121 to mute, but mute button is 113.
add "$setkeycodes e020 121" to /etc/event.d/rc2 script section before exec line.
reboot and mute function keycode will change to 121.
modify /usr/share/acpi-support/key-constants 113 to 121
refer to the page
http://darkknight9.blogspot.com/2005/08/custom-keybinding-gnome.html
"Application/System Tools/Configuration Editor" for metacity "keybindings" function.
Command line wireless enablement
It's just refer to someone readme file, but properly useful when no GUI.
"ifconfig wlan0 up"
"ifconfig" to check the "wlan0" section
"iwlist scan" to scan all AP (The essid "testap" for example)
"iwconfig wlan0 essid testap" to set up essid
"ifconfig wlan0 broadcast 192.168.0.255 netmask 255.255.255.0 192.168.0.100"
"route add default gw 192.168.0.1 dev wlan0"
"ifconfig wlan0 up"
"ifconfig" to check the "wlan0" section
"iwlist scan" to scan all AP (The essid "testap" for example)
"iwconfig wlan0 essid testap" to set up essid
"ifconfig wlan0 broadcast 192.168.0.255 netmask 255.255.255.0 192.168.0.100"
"route add default gw 192.168.0.1 dev wlan0"
星期一, 12月 08, 2008
Useful basic information for hibernate function under RHEL or SuSE
I use Ubuntu with rtl8187 module for realtek chipset.
The sleep/suspend/hibernate function all fail in just starting stage and without any errors.
The solution and information:
Hibernate issues almost caused by driver, especially network and storage driver.
No screen, just can remove some drivers first.
Use pm-suspend/pm-hibernate or /sys/power/ folder to test.
Method 1
in /etc/pm/conf.d/ create a file name "unload_module" (any name is fine)
in unload_module add a line "SUSPEND_MODULES="rtl8187 rt8189 .....""
Method 2
add "02wireless" file in /usr/lib/pm-utils/sleep.d/ and the content as followings.
#!/bin/sh
case $1 in
suspend|hibernate) ifdown wlan0 ; rmmod rtl8187 ;;
resume|thaw) modprobe rtl8187 ;;
*) exit $NA ;;
esac
exit 0
** Still need to clean something in the future.
RHEL
package: hal/pm-utils
folder: /etc/pam.d;/etc/hal;/usr/lib64/hal;/usr/lib/pm-utils/sleep.d (hibernate stage folder)
command: pm-hibernate;lshal
script file: /usr/lib64/hal/scripts/linux/hal-system-power-hibernate-linux
(can check hal package list.)
log: /var/log/pm/suspend.log
SuSE
package: hal/powersave
folder: /etc/hal;
command: powersave;lshal
script file:
1. /usr/lib64/hal/scripts/hal-system-power-hibernate
2. /usr/lib/powersave/scripts/prepare_suspend_to_disk (include GRUB info)
3. /usr/lib/powersave/scripts/sleep_helper_functions
log: /var/log/suspend2disk.log
The sleep/suspend/hibernate function all fail in just starting stage and without any errors.
The solution and information:
Hibernate issues almost caused by driver, especially network and storage driver.
No screen, just can remove some drivers first.
Use pm-suspend/pm-hibernate or /sys/power/ folder to test.
Method 1
in /etc/pm/conf.d/ create a file name "unload_module" (any name is fine)
in unload_module add a line "SUSPEND_MODULES="rtl8187 rt8189 .....""
Method 2
add "02wireless" file in /usr/lib/pm-utils/sleep.d/ and the content as followings.
#!/bin/sh
case $1 in
suspend|hibernate) ifdown wlan0 ; rmmod rtl8187 ;;
resume|thaw) modprobe rtl8187 ;;
*) exit $NA ;;
esac
exit 0
** Still need to clean something in the future.
RHEL
package: hal/pm-utils
folder: /etc/pam.d;/etc/hal;/usr/lib64/hal;/usr/lib/pm-utils/sleep.d (hibernate stage folder)
command: pm-hibernate;lshal
script file: /usr/lib64/hal/scripts/linux/hal-system-power-hibernate-linux
(can check hal package list.)
log: /var/log/pm/suspend.log
SuSE
package: hal/powersave
folder: /etc/hal;
command: powersave;lshal
script file:
1. /usr/lib64/hal/scripts/hal-system-power-hibernate
2. /usr/lib/powersave/scripts/prepare_suspend_to_disk (include GRUB info)
3. /usr/lib/powersave/scripts/sleep_helper_functions
log: /var/log/suspend2disk.log
星期六, 10月 04, 2008
一篇對RHEL Performance不錯的文章
According to below link.
http://searchenterpriselinux.techtarget.com/tip/0,289483,sid39_gci1332851,00.html
http://searchenterpriselinux.techtarget.com/tip/0,289483,sid39_gci1332851,00.html
星期三, 9月 10, 2008
Linux下的Hibernate(Suspend to Disk) – ACPI定義的睡眠模式之一
延續上一篇“電源管理—Linux下的ACPI”,這次談談更深入的Linux Hibernate的作法。Linux在許多使用上,其實都已經做到Desktop所需要的功能,像我所要介紹的Hibernate功能就是其中之一。
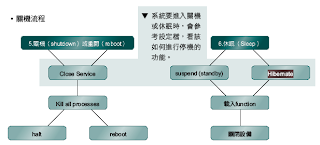
從上圖中可以發現,Hibernate和關機的差異是非常大的,可以說是完全不一樣的事情,在一般看得到的書中,Hibernate就是一般我們在ACPI中所謂的G1S4。
G1指得是“Sleeping”,也就是睡眠狀態,一般會用到G1的情況有兩種,Standby或Hibernate,分別為G1S3與G1S4,這兩種的差異主要在於Suspend to RAM(STR)及Suspend to Disk(STD)。
因此S4指得則是第四個階段,也就是Suspend to Disk(STD),所以G1S4整體的意思就是讓系統睡得程度到“Hibernate”階段。之前使用者較常會用到的應該是S3,因此電源都無法完全關掉,會有些許的電源用來供應記憶體,但S4則可以做到將電源完全關掉,而保留住系統目前的狀態。
但Hibernate的動作在Linux中是如何達到,以及到底做了哪些事情,當Hibernate進行時又是參考哪些檔案,是這篇文章中要介紹給各位的。
1. Hibernate所參考的檔案
Hibernate所參考檔案都是由pm-utils套件所提供的,pm-utils是一套電源管理的工具軟體,在2.6的kernel之後,都已經支援ACPI的功能,所以可以做到像Hibernate的省電模式,但這些動作在啟動時,若還有硬體(像USB設備)在系統上該如何處理,就可以透過pm-utils來做一些關閉硬體的動作,但其實pm-utils是透過一個『HAL』的服務程式(在Redhat中此服務的檔案名稱為haldaemon)在控制,所以一般看不到pm的字眼。不過雖然是透過HAL在操作,但使用者一樣可以加一些自己的動作在其中,做細部的調整。
基本上pm-utils除了【/etc/pm】這一個目錄外,【/usr/lib/pm-utils】也是主要的目錄之一,其實如果細看【/etc/pm】,裡面是空無一物,因為這是預留給使用者自行使用的地方,系統真正在執行的,是在【/usr/lib/pm-utils】底下的檔案,不過【/etc/pm】是可以使用的,只是檔案要自行產生。
在【/usr/lib/pm-utils】下,最好用的目錄就要屬sleep.d這一個(如下圖所示),因為當使用者在進行Hibernate(休眠模式)時,就會依據這目錄中的檔名前兩碼數字的大小(由小到大),依序進行執行的動作(正常應該說是關閉的動作,但因為可以自行設定,不在這邊定義為關閉);相同的,在【/etc/pm】的目錄下,也有和這邊類似的目錄,只是都是空的,這在上面有提過。不過這邊有幾點是要特別注意的:
a. 系統在進行Hibernate時,是先執行【/etc/pm】的目錄,再執行【/usr/lib/pm-utils】目錄中的檔案;但啟動是相反的,會先執行【/usr/lib/pm-utils】後,再執行【/etc/pm】目錄下的檔案。
b. 系統在進行Hibernate時,會從目錄中檔名的前兩碼數字由小到大進行執行動作;但再開機時,是相反的,也就是會由數字大到小執行。
這兩點要注意的原因,主要是一般預設立場是要進行關閉的動作,所以往往會忽略開機時是要進行啟動,剛好目的是相反的,自然順序也就跟著變動,在細節的設計上要特別注意。

2. Hibernate所進行的方式
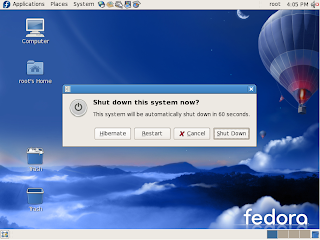
最簡單要進行Hibernate的方式,就是在X Window關機時,不要用原本關機的選項,而改用『Hibernate』的方式(如下圖所示),只要點選下去,系統就會自動進行Hibernate,但要注意,若系統中的“haldaemon”沒有啟動,是不會有這選項的。
如果需要比較進階的使用,就必需要參考到/sys/power目錄,該目錄是主要Hibernate在進行時的“開關”,這一個目錄只存放和電源模式有關的檔案,更正確的說法,是只有電源管理機制的檔案。裡面只有幾個屬性檔案在其中,屬性名稱(也就是檔案名稱)及其值都請參考下圖

每個屬性的意義介紹如下:
1. disk:當使用者在做休眠模式中S4的STD(suspend to disk,或稱為Hibernate)時,要將系統的狀況寫入到硬碟中,因此這邊是在定義當狀態寫入到硬碟後,“系統”該如何運作。基本上目前2.6的kernel支援以下五種模式:
a. platform:不知其運作方式,但只有在該平台有支援時才可使用。
b. shutdown:當進入休眠時進入關機狀態。
c. reboot:當進入休眠時進入重新開機狀態。
d. testproc:testproc與下一個test,這兩者的模式比較特別,都是屬於即時測試休眠功能所可可以使用的狀態,也就是可以讓使用者進入模擬的休眠模式,再自動回複到原本的系統狀態,所以一直都在原本的使用狀態下。
testproc主要有以下幾個步驟(系統訊息如下圖所示):
關閉未使用的CPU 凍結所有的工作 等五秒鐘 將原本的工作還原 打開原本未啟動的CPU
e. test:和前一個testproc的不同,是在測試時更完整,連記憶體和硬體設備的部份也加入模擬的階段。
test主要有以下幾個步驟(系統訊息如下圖所示):
關閉未使用的CPU 凍結所有的工作 壓縮記憶體 關閉設備 等五秒鐘 恢復設備的狀態 將原本的工作還原 打開原本未啟動的CPU

這五種中最常被使用的就是“shutdown”(a不知其作用為何,但一定要系統有支援才可使用),後三者(“reboot”、“testproc”、“test”)則較少為人知,因為這三種大部份是在測試單位(可能也只在專門測試休眠功能的單位)才有機會被使用到,不然使用的機會少之又少,但實在是一個造福測試者的功能。不過使用上真的很簡單,如筆者電腦的“disk”檔案預設設定為“shutdown”,如果更改為“reboot”,當休眠完成後,將不會關機,而是“重開”。
所以想當然,誰會在做休眠時的下一步要“重新開機”,這樣完全無法省電,所比這一個機制其實是還是為了測試休眠模式所定義的,只是可能會將測試的範圍擴大到整個系統的流程,而不是像“testproc”和“test”僅限於測試休眠的部份功能,畢竟完整的動作是包含關機與開機。
2. image_size:目前系統可接受的最大image大小,預設為512MB。
3. pm_trace:這是一個控制開關,可比決定是否要記錄在多次的重新開機後,最後一次存在RTC中的事件點,預設值為“0”,代表不記錄,若改為“1”,則可進行記錄的動作。
4. resume:當系統進行S4(suspend to disk)時,系統要將系統狀態寫入的位置。所以這屬性其實是代表某一個分割區的major及minor ID(一般都是SWAP分割區),若需要使用resume分割區,就必須在開機時先在GRUB的開機參數中,加入resume=/dev/xxxx的參數,才可以讓系統知道要使用該分割區當寫入的分割區。在下圖中的resume值之所以為“0:0”,是因為主機中沒有設定該參數(SuSE在預設就會加入該參數)。
5. state:目前系統可支援的休眠模式,一般只會有以下三種(或只有其中一兩種)狀態(S2一般電腦都不會支援):
a. standby:就是一般所謂的S1,S1是在睡眠狀態中最吃電的一種狀態,CPU中的cache都持續供電,但停止執行指令。在CPU及記憶體的部份都有電力在供應,但其他的裝置就沒有硬性規定,可斷電也可供電。
b. mem:就是S3(suspend to ram),在此狀態下,只有主記憶體有接受供電的權利。但值得注意的是,雖然大部份的資料都會回寫到記憶體,但硬碟本身的Buffer有可能來不及回寫到硬碟,這樣就會造成資料流失。
c. disk:就是S4(suspend to disk),俗稱休眠狀態(Hibernet,或稱冬眠狀態),其技術上的名稱則為Suspend to Disk (STD),這一階段會將所有執行中的資料全部寫入到硬碟中,而之所以要寫入硬碟,就是因為要完全的斷電,但也因為如此,在回覆到原本工作狀態所使用的時間會比S3來得久。
更簡單的說,其實如果將“state”檔案以“disk”值寫入(如:【echo “disk” > /sys/power/state】),這動作等於切換“state”開關至“disk”選項,因此系統就會直接進入休眠,並且將休眠模式認定為前面我們提過的“disk”檔案中所記載的方式,像“shutdown”。

從上圖中可以發現,Hibernate和關機的差異是非常大的,可以說是完全不一樣的事情,在一般看得到的書中,Hibernate就是一般我們在ACPI中所謂的G1S4。
G1指得是“Sleeping”,也就是睡眠狀態,一般會用到G1的情況有兩種,Standby或Hibernate,分別為G1S3與G1S4,這兩種的差異主要在於Suspend to RAM(STR)及Suspend to Disk(STD)。
因此S4指得則是第四個階段,也就是Suspend to Disk(STD),所以G1S4整體的意思就是讓系統睡得程度到“Hibernate”階段。之前使用者較常會用到的應該是S3,因此電源都無法完全關掉,會有些許的電源用來供應記憶體,但S4則可以做到將電源完全關掉,而保留住系統目前的狀態。
但Hibernate的動作在Linux中是如何達到,以及到底做了哪些事情,當Hibernate進行時又是參考哪些檔案,是這篇文章中要介紹給各位的。
1. Hibernate所參考的檔案
Hibernate所參考檔案都是由pm-utils套件所提供的,pm-utils是一套電源管理的工具軟體,在2.6的kernel之後,都已經支援ACPI的功能,所以可以做到像Hibernate的省電模式,但這些動作在啟動時,若還有硬體(像USB設備)在系統上該如何處理,就可以透過pm-utils來做一些關閉硬體的動作,但其實pm-utils是透過一個『HAL』的服務程式(在Redhat中此服務的檔案名稱為haldaemon)在控制,所以一般看不到pm的字眼。不過雖然是透過HAL在操作,但使用者一樣可以加一些自己的動作在其中,做細部的調整。
基本上pm-utils除了【/etc/pm】這一個目錄外,【/usr/lib/pm-utils】也是主要的目錄之一,其實如果細看【/etc/pm】,裡面是空無一物,因為這是預留給使用者自行使用的地方,系統真正在執行的,是在【/usr/lib/pm-utils】底下的檔案,不過【/etc/pm】是可以使用的,只是檔案要自行產生。
在【/usr/lib/pm-utils】下,最好用的目錄就要屬sleep.d這一個(如下圖所示),因為當使用者在進行Hibernate(休眠模式)時,就會依據這目錄中的檔名前兩碼數字的大小(由小到大),依序進行執行的動作(正常應該說是關閉的動作,但因為可以自行設定,不在這邊定義為關閉);相同的,在【/etc/pm】的目錄下,也有和這邊類似的目錄,只是都是空的,這在上面有提過。不過這邊有幾點是要特別注意的:
a. 系統在進行Hibernate時,是先執行【/etc/pm】的目錄,再執行【/usr/lib/pm-utils】目錄中的檔案;但啟動是相反的,會先執行【/usr/lib/pm-utils】後,再執行【/etc/pm】目錄下的檔案。
b. 系統在進行Hibernate時,會從目錄中檔名的前兩碼數字由小到大進行執行動作;但再開機時,是相反的,也就是會由數字大到小執行。
這兩點要注意的原因,主要是一般預設立場是要進行關閉的動作,所以往往會忽略開機時是要進行啟動,剛好目的是相反的,自然順序也就跟著變動,在細節的設計上要特別注意。

2. Hibernate所進行的方式
最簡單要進行Hibernate的方式,就是在X Window關機時,不要用原本關機的選項,而改用『Hibernate』的方式(如下圖所示),只要點選下去,系統就會自動進行Hibernate,但要注意,若系統中的“haldaemon”沒有啟動,是不會有這選項的。

如果需要比較進階的使用,就必需要參考到/sys/power目錄,該目錄是主要Hibernate在進行時的“開關”,這一個目錄只存放和電源模式有關的檔案,更正確的說法,是只有電源管理機制的檔案。裡面只有幾個屬性檔案在其中,屬性名稱(也就是檔案名稱)及其值都請參考下圖

每個屬性的意義介紹如下:
1. disk:當使用者在做休眠模式中S4的STD(suspend to disk,或稱為Hibernate)時,要將系統的狀況寫入到硬碟中,因此這邊是在定義當狀態寫入到硬碟後,“系統”該如何運作。基本上目前2.6的kernel支援以下五種模式:
a. platform:不知其運作方式,但只有在該平台有支援時才可使用。
b. shutdown:當進入休眠時進入關機狀態。
c. reboot:當進入休眠時進入重新開機狀態。
d. testproc:testproc與下一個test,這兩者的模式比較特別,都是屬於即時測試休眠功能所可可以使用的狀態,也就是可以讓使用者進入模擬的休眠模式,再自動回複到原本的系統狀態,所以一直都在原本的使用狀態下。
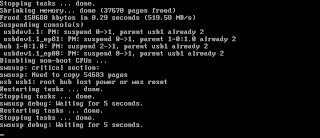
testproc主要有以下幾個步驟(系統訊息如下圖所示):
關閉未使用的CPU 凍結所有的工作 等五秒鐘 將原本的工作還原 打開原本未啟動的CPU

e. test:和前一個testproc的不同,是在測試時更完整,連記憶體和硬體設備的部份也加入模擬的階段。
test主要有以下幾個步驟(系統訊息如下圖所示):
關閉未使用的CPU 凍結所有的工作 壓縮記憶體 關閉設備 等五秒鐘 恢復設備的狀態 將原本的工作還原 打開原本未啟動的CPU

這五種中最常被使用的就是“shutdown”(a不知其作用為何,但一定要系統有支援才可使用),後三者(“reboot”、“testproc”、“test”)則較少為人知,因為這三種大部份是在測試單位(可能也只在專門測試休眠功能的單位)才有機會被使用到,不然使用的機會少之又少,但實在是一個造福測試者的功能。不過使用上真的很簡單,如筆者電腦的“disk”檔案預設設定為“shutdown”,如果更改為“reboot”,當休眠完成後,將不會關機,而是“重開”。
所以想當然,誰會在做休眠時的下一步要“重新開機”,這樣完全無法省電,所比這一個機制其實是還是為了測試休眠模式所定義的,只是可能會將測試的範圍擴大到整個系統的流程,而不是像“testproc”和“test”僅限於測試休眠的部份功能,畢竟完整的動作是包含關機與開機。
2. image_size:目前系統可接受的最大image大小,預設為512MB。
3. pm_trace:這是一個控制開關,可比決定是否要記錄在多次的重新開機後,最後一次存在RTC中的事件點,預設值為“0”,代表不記錄,若改為“1”,則可進行記錄的動作。
4. resume:當系統進行S4(suspend to disk)時,系統要將系統狀態寫入的位置。所以這屬性其實是代表某一個分割區的major及minor ID(一般都是SWAP分割區),若需要使用resume分割區,就必須在開機時先在GRUB的開機參數中,加入resume=/dev/xxxx的參數,才可以讓系統知道要使用該分割區當寫入的分割區。在下圖中的resume值之所以為“0:0”,是因為主機中沒有設定該參數(SuSE在預設就會加入該參數)。
5. state:目前系統可支援的休眠模式,一般只會有以下三種(或只有其中一兩種)狀態(S2一般電腦都不會支援):
a. standby:就是一般所謂的S1,S1是在睡眠狀態中最吃電的一種狀態,CPU中的cache都持續供電,但停止執行指令。在CPU及記憶體的部份都有電力在供應,但其他的裝置就沒有硬性規定,可斷電也可供電。
b. mem:就是S3(suspend to ram),在此狀態下,只有主記憶體有接受供電的權利。但值得注意的是,雖然大部份的資料都會回寫到記憶體,但硬碟本身的Buffer有可能來不及回寫到硬碟,這樣就會造成資料流失。
c. disk:就是S4(suspend to disk),俗稱休眠狀態(Hibernet,或稱冬眠狀態),其技術上的名稱則為Suspend to Disk (STD),這一階段會將所有執行中的資料全部寫入到硬碟中,而之所以要寫入硬碟,就是因為要完全的斷電,但也因為如此,在回覆到原本工作狀態所使用的時間會比S3來得久。
更簡單的說,其實如果將“state”檔案以“disk”值寫入(如:【echo “disk” > /sys/power/state】),這動作等於切換“state”開關至“disk”選項,因此系統就會直接進入休眠,並且將休眠模式認定為前面我們提過的“disk”檔案中所記載的方式,像“shutdown”。
訂閱:
文章 (Atom)